本文为大家分享了iOS图片模糊效果的三种实现方式,供大家参考,具体内容如下
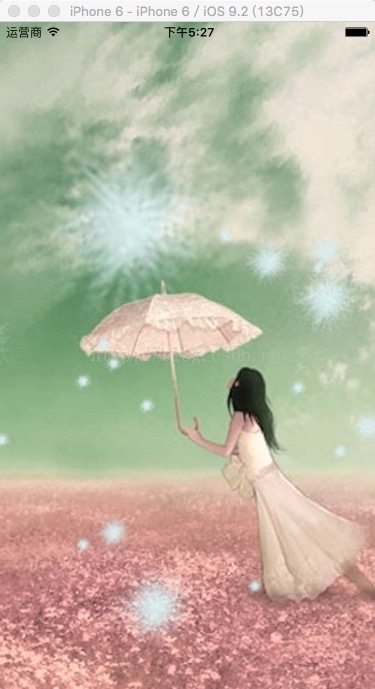
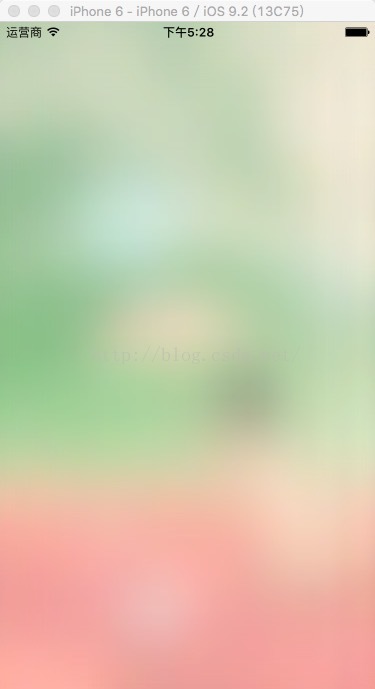
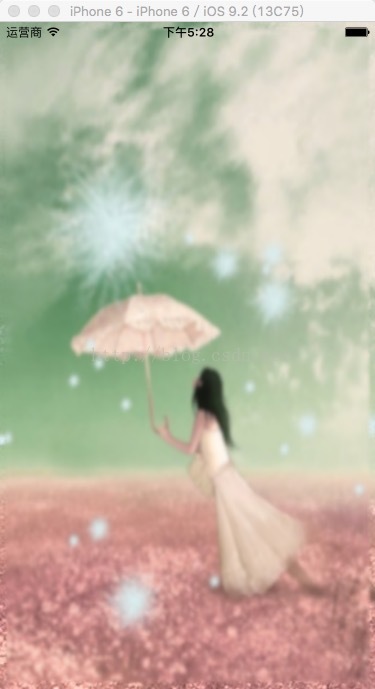
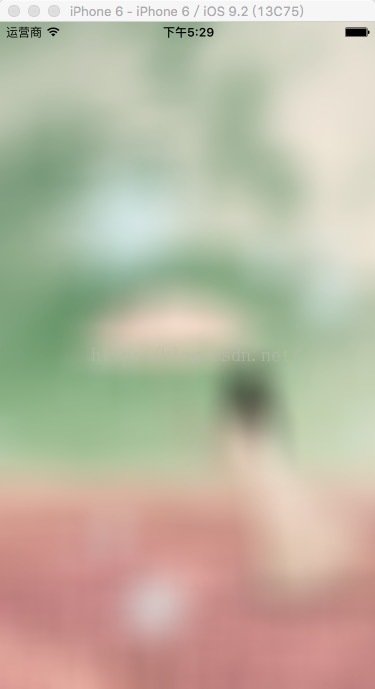
1.实现效果依次如图:原图、iOS8效果、Core Image效果、 VImage 效果
 -
-
2. 代码
#import "ViewController.h"
#import <Accelerate/Accelerate.h>

@interface ViewController ()

@end

@implementation ViewController

- (void)viewDidLoad {
 [super viewDidLoad];
 self.view.backgroundColor = [UIColor colorWithPatternImage:[UIImage imageNamed:@"background"]];

// [self iOS8BlurImageImplement];
// [self coreImageImplement];
 [self vImageImplement];
}

// iOS8 使用系统自带的处理方式
- (void)iOS8BlurImageImplement {
 UIBlurEffect *beffect = [UIBlurEffect effectWithStyle:UIBlurEffectStyleLight];
 UIVisualEffectView *view = [[UIVisualEffectView alloc] initWithEffect:beffect];
 view.frame = self.view.bounds;
 [self.view addSubview:view];
}


// 使用CoreImage实现图片模糊
- (void)coreImageImplement{
 CIContext *context = [CIContext contextWithOptions:nil];

 NSError *error = nil;
 NSString *filePath = [[NSBundle mainBundle] pathForResource:@"background" ofType:@"png"];
 NSData *imageData = [NSData dataWithContentsOfFile:filePath options:NSDataReadingUncached error:&error];

 //NSData *imageData = [NSData dataWithContentsOfFile:@"background.png"];
 CIImage *image = [CIImage imageWithData:imageData];
 CIFilter *filter = [CIFilter filterWithName:@"CIGaussianBlur"];
 [filter setValue:image forKey:kCIInputImageKey];
 [filter setValue:@2.0f forKey:@"inputRadius"];
 CIImage *result = [filter valueForKey:kCIOutputImageKey];
 CGImageRef outImage = [context createCGImage:result fromRect:[result extent]];
 UIImage *bluerImage = [UIImage imageWithCGImage:outImage];

 UIImageView *imageView = [[UIImageView alloc] initWithImage:bluerImage];
 imageView.frame = self.view.bounds;
 [self.view addSubview:imageView];
}


// 使用vImage API实现图片模糊
// iOS5.0中新增了vImage API可以使用,它属于Accelerate.Framework,所以如果你要使用它要在工程中加入这个Framework。模糊算法使用的是vImageBoxConvolve_ARGB8888这个函数。
- (void)vImageImplement {
 UIImage *image = [UIImage imageNamed:@"background"];
 UIImage *blurImage = [self blurryImage:image withBlurLevel:0.5];
 self.view.backgroundColor = [UIColor colorWithPatternImage:blurImage];
}

- (UIImage *)blurryImage:(UIImage *)image withBlurLevel:(CGFloat)blur {
 if (blur < 0.f || blur > 1.f) {
  blur = 0.5f;
 }
 int boxSize = (int)(blur * 100);
 boxSize = boxSize - (boxSize % 2) + 1;

 CGImageRef img = image.CGImage;

 vImage_Buffer inBuffer, outBuffer;
 vImage_Error error;

 voidvoid *pixelBuffer;

 CGDataProviderRef inProvider = CGImageGetDataProvider(img);
 CFDataRef inBitmapData = CGDataProviderCopyData(inProvider);

 inBuffer.width = CGImageGetWidth(img);
 inBuffer.height = CGImageGetHeight(img);
 inBuffer.rowBytes = CGImageGetBytesPerRow(img);

 inBuffer.data = (void*)CFDataGetBytePtr(inBitmapData);

 pixelBuffer = malloc(CGImageGetBytesPerRow(img) *
       CGImageGetHeight(img));

 if(pixelBuffer == NULL)
  NSLog(@"No pixelbuffer");

 outBuffer.data = pixelBuffer;
 outBuffer.width = CGImageGetWidth(img);
 outBuffer.height = CGImageGetHeight(img);
 outBuffer.rowBytes = CGImageGetBytesPerRow(img);

 error = vImageBoxConvolve_ARGB8888(&inBuffer,
          &outBuffer,
          NULL,
          0,
          0,
          boxSize,
          boxSize,
          NULL,
          kvImageEdgeExtend);


 if (error) {
  NSLog(@"error from convolution %ld", error);
 }

 CGColorSpaceRef colorSpace = CGColorSpaceCreateDeviceRGB();
 CGContextRef ctx = CGBitmapContextCreate(
            outBuffer.data,
            outBuffer.width,
            outBuffer.height,
            8,
            outBuffer.rowBytes,
            colorSpace,
            kCGImageAlphaNoneSkipLast);
 CGImageRef imageRef = CGBitmapContextCreateImage (ctx);
 UIImage *returnImage = [UIImage imageWithCGImage:imageRef];

 //clean up
 CGContextRelease(ctx);
 CGColorSpaceRelease(colorSpace);

 free(pixelBuffer);
 CFRelease(inBitmapData);

 CGColorSpaceRelease(colorSpace);
 CGImageRelease(imageRef);

 return returnImage;
}

@end
以上就是本文的全部内容,希望对大家的学习有所帮助,也希望大家多多支持得得之家。
本站部分内容来源互联网,如果有图片或者内容侵犯您的权益请联系我们删除!