android自带的下拉框好用不?我觉得有时候好用,有时候难有,项目规定这样的效果,自带的控件实现不了,那么只有我们自己来老老实实滴写一个新的了,其实最基本的下拉框就像一些资料填写时,点击的时候出现在编辑框的下面,然后又很多选项的下拉框,可是我在网上找了一下,没有这种下拉框额,就自己写了一个,看效果图先:
 ,这个是资料填写的一部分界面,三个下拉框,选择故乡所在地;
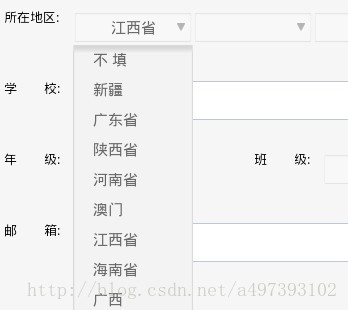 点击之后弹出下拉框,选择下面的选项;
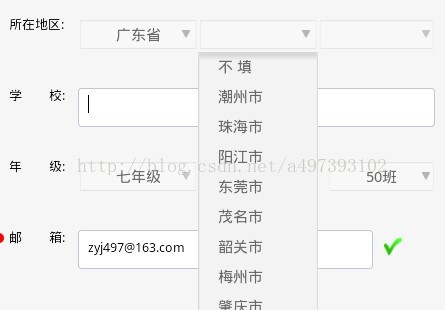 三个下拉框时关联的,第一个决定了第二数据内容,第二个决定了第三个数据内容,如果三个全部选好之后,再次点击第一个,那么第二个、第三个都会清空,点击第二个则第三个会清空。
要实现它,也就是一个PopupWindow时主要的界面,下面来看看代码:
创建一个DefineSpinnerView.java文件,继承至View,然后给出如下属性:
- /**
- * 用于弹出的下拉框
- */
- private PopupWindow pWindow = null;
- // **************************************************************************
- // 这些是用来当点击一个时,根据他们之间的关系来显示下拉框中的内容
- // **************************************************************************
- /**
- * 祖父
- */
- private DefineSpinnerView gradeParent = null;
- /**
- * 父控件
- */
- private DefineSpinnerView parents = null;
- /**
- * 子控件
- */
- private DefineSpinnerView child1 = null;
- /**
- * 孙子控件
- */
- private DefineSpinnerView child2 = null;
- private Context context = null;
- private OptionsAdapter adapter = null; // 下拉框适配器
- private List<String> datas = null; // 下拉框数据
- private RelativeLayout layout = null; // 父控件
- private TextView text = null; // 文本显示
- private ImageView image = null; // 下拉箭头
- private int p_width = -1; // 下拉框宽度
- private ListView list = null; // 下拉表
在构造函数中,构造出一个TextView和一个ImageView控件,并将它们都添加到layout中,代码如下:
- TextListener lis = new TextListener();
- text = new TextView(context);
- text.setBackgroundResource(R.drawable.edit_normal);
- text.setTextColor(getResources().getColor(R.color.spinner_text));
- text.setGravity(Gravity.CENTER);
- text.setOnClickListener(lis);
- LayoutParams params1 = new LayoutParams(width, hight);
- params1.leftMargin = left;
- params1.topMargin = top;
- image = new ImageView(context);
- image.setBackgroundResource(R.drawable.gerendang_jiantou);
- image.setOnClickListener(lis);
- if (LoginAct.MACHINE_PIXELS == IFinalConstant.XHDPI_RESOLUTION) {
- text.setTextSize(20.0f);
- LayoutParams params2 = new LayoutParams(19, 17);
- params2.topMargin = top + 15;
- params2.leftMargin = left + width - 28;
- map.put(image, params2);
- } else {
- text.setTextSize(15.0f);
- LayoutParams params2 = new LayoutParams(8, 8);
- params2.topMargin = top + 13;
- params2.leftMargin = left + width - 16;
- map.put(image, params2);
- }
- map.put(text, params1);
里面涉及到一个TextListener内部类,是我们自己定义的一个类,它继承至OnClickListener接口
- /**
- * @author ZYJ
- * 当点击Text时,根据上一级的内容来设置下一级的内容
- */
- class TextListener implements OnClickListener {
- public void onClick(View v) {
- hideSoft ();
- if (gradeParent != null && parents != null) {
- DefineSpinnerView.this.setDatas(DefineSpinnerView.this
- .getGuxiang3(gradeParent.getText(), parents.getText()));
- }
- if (gradeParent == null && parents != null) {
- DefineSpinnerView.this.setDatas(DefineSpinnerView.this
- .getGuxiang2(parents.getText()));
- }
- cleanText();
- changPopState(text);
- }
这个里面调用了一个方法changPopState,它的定义如下:
- /**
- * 显示或者隐藏下拉框
- *
- * @param v
- */
- private void changPopState(View v) {
- if (pWindow == null) {
- popWindow(v);
- return;
- }
- if (!pWindow.isShowing()) {
- popWindow(v);
- } else {
- if (pWindow != null) {
- pWindow.dismiss();
- }
- }
- }
这个里面又调用了一个popWindow方法,定义如下:
- /**
- * 初始化下拉框
- *
- * @param par 父控件
- */
- private void popWindow(final View par) {
- if (pWindow == null) {
- // 布局文件
- View v = LayoutInflater.from(context).inflate(R.layout.list, null);
- list = (ListView) v.findViewById(R.id.list);
- list.setOnItemClickListener(new OnItemClickListener() {
- public void onItemClick(AdapterView<?> arg0, View arg1,
- int arg2, long arg3) {
- // R.String.butian代表的是“不填”
- if (datas.get(arg2).toString().equals(context.getString(R.string.butian))) {
- text.setText("");
- } else {
- text.setText(datas.get(arg2).toString()); // 将当前点击的item中的字符串显示出来
- }
- if (pWindow != null) { // 关闭下拉框
- changPopState(par);
- }
- }
- });
- adapter = new OptionsAdapter(context, datas); // 根据数据,设置下拉框显示
- list.setAdapter(adapter);
- list.setDivider(null); // 屏蔽下拉框每个item之间的线条
- /**
- * 两种不同长度的下拉框,主要是为了适应屏幕的大小
- */
- if (p_width > 0) {
- pWindow = new PopupWindow(v, par.getWidth(), 150);
- } else {
- pWindow = new PopupWindow(v, par.getWidth(), 300);
- }
- pWindow.setFocusable(true);
- pWindow.setBackgroundDrawable(new BitmapDrawable());
- pWindow.setOutsideTouchable(true);
- pWindow.update();
- }
- pWindow.showAsDropDown(text);
- }
然后是一些细节了,提供一个TextView设置上面文字和得到上面文字的方法,设置下拉框数据的方法setDatas,如下:
- public void setText(String str) {
- if (text != null) {
- text.setText(str);
- }
- }
- public void setDatas(List<String> datas) {
- this.datas = datas;
- if (adapter != null) {
- adapter.setDatas(datas);
- adapter.notifyDataSetInvalidated();
- }
- }
- public String getText() {
- if (text != null) {
- return text.getText().toString();
- }
- LoginAct.LogW("spinner's textView is null");
- return "";
- }
- private void cleanText() {
- if (child1 != null) {
- child1.text.setText("");
- }
- if (child2 != null) {
- child2.text.setText("");
- }
- }
然后添加几个关联控件的get方法:
- public void setChild1(DefineSpinnerView child1) {
- this.child1 = child1;
- }
- public void setChild2(DefineSpinnerView child2) {
- this.child2 = child2;
- }
- public void setGradeParent(DefineSpinnerView gradeParent) {
- this.gradeParent = gradeParent;
- }
- public void setParents(DefineSpinnerView parents) {
- this.parents = parents;
- }
- public void setP_width(int p_width) {
- this.p_width = p_width;
- }
接下来提供一个设置子控件和算子控件数据的方法:
- /**
- * @param s1 父控件中的字符串
- * @param s2 子控件中的字符串
- * @return 返回一个List<String>集合
- * @功能 通过父控件的字符串来设置子控件中的内容
- */
- private List<String> getGuxiang3(String s1, String s2) {
- List<String> dd = new ArrayList<String>();
- dd.add(context.getString(R.string.butian));
- Map<String, ArrayList<String>> mapTmp1 = MaterialView.cityMap.get(s1);
- if (mapTmp1 != null) {
- List<String> list = mapTmp1.get(s2);
- if (list != null) {
- for (String str : list) {
- dd.add(str);
- }
- }
- }
- return dd;
- }
- /**
- * @param s 字符串
- * @return
- * @author ZYJ
- * @功能 设置父亲辈的下拉框中的内容
- */
- private List<String> getGuxiang2(String s) {
- List<String> dd = new ArrayList<String>();
- dd.add(context.getString(R.string.butian));
- Map<String, ArrayList<String>> mapTmp = MaterialView.cityMap.get(s);
- if (mapTmp != null) {
- for (String str : mapTmp.keySet()) {
- dd.add(str);
- }
- }
- return dd;
- }
最后提供一个隐藏软键盘的方法:
- private void hideSoft() {
- putMethodManager imm = (InputMethodManager) context
- .getSystemService(Context.INPUT_METHOD_SERVICE);
- m.toggleSoftInput(InputMethodManager.SHOW_IMPLICIT,
- InputMethodManager.HIDE_NOT_ALWAYS);
到这里,自定义控件的代码基本上写完了;我们还要来看看下拉框中的xml布局和适配器的写法:
xml文件:
- <LinearLayout xmlns:android="http://schemas.android.com/apk/res/android"
- xmlns:tools="http://schemas.android.com/tools"
- android:layout_width="match_parent"
- android:layout_height="match_parent"
- android:orientation="horizontal">
- <TextView
- android:id="@+id/info"
- android:layout_width="wrap_content"
- android:layout_height="30dp"
- android:textSize="15sp"
- android:textColor="@color/spinner_text"
- android:layout_gravity="center"
- android:gravity="center"/>
- </LinearLayout>
然后是适配器类(OptionsAdapter),看全部代码吧:
- public class OptionsAdapter extends BaseAdapter {
- private Context context = null;
- private List<String> datas = null;
- public OptionsAdapter(Context context, List<String> d) {
- this.context = context;
- this.datas = d;
- }
- public int getCount() {
- return datas.size();
- }
- public Object getItem(int arg0) {
- return datas.get(arg0);
- }
- public long getItemId(int arg0) {
- return arg0;
- }
- /**
- * @author ZYJ
- * @功能 一个简单TextView显示
- */
- public View getView(int arg0, View arg1, ViewGroup arg2) {
- View view = LayoutInflater.from(context).inflate(R.layout.childlist,
- null);
- TextView textStr = (TextView) view.findViewById(R.id.info);
- textStr.setText("\t" + getItem(arg0).toString());
- return view;
- }
- public void setDatas(List<String> datas) {
- this.datas = datas;
- }
- }
这样,上面的功能基本上都实现了,我的这个控件在我项目中是手动添加上去的,而不是定义在xml文件中的,所以也不知道定义在xml文件中能不能生效,各位尽管试试吧。
转自:http://blog.csdn.net/a497393102/article/details/9279309